Setting up Railgun on cPanel

Using Railgun for faster load times and more efficient caching.

CP+RG

Nearly 70% of web content is cacheable (JS, CSS, & HTML). CloudFlare’s CDN leverages this by sync’ing to multiple datacenters worldwide.

They’ve taken it a step further with their RailGun Tech. RailGun maintains an active TLS/TCP link at which is able to cache up to 99.6% of the data from the origin server to CloudFlare.

Website structure changes are typically infrequent (body, tags, scripts, JSON API responses). When dynamic content changes, markup code is typically only slightly affected.

The “listener” module on the origin server detects these changes and syncs to the “sender” module on the CloudFlare network.

Installing RailGun on any RPM-based x64 server is simple.

Add the server’s IP(s) to your RailGuns in the CloudFlare Partner Panel

RailgunPartnerPortal

Prep the server by opening firewall TCP/2408 to CloudFlare’s Network IPs:

IPv4

103.21.244.0/22

103.22.200.0/22

103.31.4.0/22

104.16.0.0/12

108.162.192.0/18

131.0.72.0/22

141.101.64.0/18

162.158.0.0/15

172.64.0.0/13

173.245.48.0/20

188.114.96.0/20

190.93.240.0/20

197.234.240.0/22

198.41.128.0/17

199.27.128.0/21

IPv6

2400:cb00::/32

2405:8100::/32

2405:b500::/32

2606:4700::/32

2803:f800::/32

2c0f:f248::/32

2a06:98c0::/29

Add the following to httpd.conf

$ CloudFlareRemoteIPTrustedProxy 127.0.0.1

This adds your RailGun instance to the trusted proxy list.

Install RailGun with yum:

$ yum install railgun-stable

Activating RailGuns in cPanel:

Click the CloudFlare plugin in cPanel.cloudflare plugin

Select “Performance” from the top menu.

Performance

Scroll to the site you’d like to enable RailGun and click “Settings” to the left of the domain name you select.

Next to the RailGun option, press the “Off” button to toggle it to “On”

railgun

That’s it.

Any domain that is setup on CloudFlare’s DNS and has it’s IP listed in the partner panel can utilize Railgun via cPanel.


cPanel+CloudFlare cPanel Plugin

cPanel + CloudFlare cPanel Plugin

cP+CF

Maximizing security and efficiency.

Now that the CloudFlare cPanel plugin has been released, it’s easier than ever to setup your zones under CloudFlare’s protection from within cPanel.

cloudflare_plugin

Enabling the CloudFlare plugin is simple.

SSH to your server as root.

Download the plugin from GitHub and set it up with your Host API Key from CloudFlare and your company’s name.

bash <(curl -s https://raw.githubusercontent.com/Cloudflare/Cloudflare-CPanel/
master/Cloudflare.install.sh) -k HOST_API_KEY -n ‘YOUR_COMPANY_NAME’

Within a few minutes you’ll see: “Cloudflare module installed successfully”

**By default, the plugin can only handle CNAME records. To enable Full DNS setup edit:
/usr/local/cpanel/base/frontend/paper_lantern/Cloudflare/config.js

change the parameter:

“featureManagerIsFullZoneProvisioningEnabled”: false
to
“featureManagerIsFullZoneProvisioningEnabled”: true

Save and you’re done.

Now your end users can click on the CloudFlare icon in cPanel and login to their own individual CloudFlare accounts.

CF cPanel

cPanel & CloudLinux – Maximizing server density and stability

CloudLinux works by isolating each user into their own virtual environment and assigning resource blocks to each individual customer (CPU, IO, RAM, System processes).

This is accomplished by utilizing a transparent kernel-level technology called LVE (Lightweight Virtual Environment).

Segmenting control of resources gives the ability to further limit resource spikes by governing MySQL usage.

The built in MySQL Governor monitors usage, throttles abusers, and prevents MySQL overages before they can even happen.

Within WHM, CloudLinux gives you the visibility to see and control the exact resource usage of each website or end user.lvemgr

CloudLinux assigns each customer an LVE ID.

Limiting resources for each LVE is a snap using the LVE Manager via WHM.

LVEWHM

High-Performance Features:

Mod_LSAPi:

  • Is faster than any other way to serve PHP with Apache.
  • Doesn’t suffer from stability issues in process management like PHP FPM and mod_fcgid.
  • Includes the full benefits of opcode caching.
  • Is compatible with MPM Worker and Event.
  • Does not require tuning.
  • Includes support for PHP directives in .htaccess files.
  • Is a drop-in replacement for SuPHP, FCGID, RUID2, and ITK
  • Compatible with PHP Seclector.

PHP Selector:

Powerful tool that lets your end users select any PHP version that they need including 4.4, 5.1-5.6, and 7.0.

Ruby Selector and Python Selector available as well.

Convert your cPanel server to a CloudLinux + cPanel in a few simple steps:

The CloudLinux installer detects which version of cPanel you have, your specific hardware requirements, and any type of virtualization being used.

Start by obtaining a license: Log in or register @ https://cln.cloudlinux.com

Find your existing key or request a free 30 day trial activation key and take note as you’ll need it for server installation in just a moment.

Download & run the conversion script

Login to your server via SSH as root

# wget https://repo.cloudlinux.com/cloudlinux/sources/cln/cldeploy

# sh cldeploy -k # if you have activation key

or

 # sh cldeploy -i # if you have IP based license

reboot

Once the server has rebooted, run SSH and check the proper kernel is being used with :

# uname –a

“lve” Will be listed in the kernel name. When you see this, you’ll know you’re setup properly.

Login to WHM and search “LVE”.

You should now see the LVEManager plugin that installed during the conversion.

cPanel + CloudLinux is a great choice whether you’re new to hosting or a datacenter looking to maximize the density of your current environment.

Discontinued support for cgiemail and cgiecho

cp_lock

Discontinued support for cgiemail and cgiecho following vulnerabilities.

cPanel is discontinuing support for cgiecho and cgiemail due to various design issues. The upstream author has abandon the project and these items will be removed from future versions of cPanel & WHM.

This is following the patched releases of cgiemail and cgiecho in the first TSR release of 2017 (TSR-2017-0001).

The Shadow Brokers confirmed the exploit on April 8 2017 using ElegantEgale on the since patched cgiemail format string injection vulnerability (CVE-2017-5613).

Versions of cPanel and WHM 54 and newer have been patched successfully.

Other exploits discovered (EndlessDonut, ElatedMonkey) have been successfully patched as well.

Ref:

http://news.cpanel.com/cpanel-security-team-cgiemail-cve-2017-5613/

https://news.cpanel.com/tsr-2017-0001-full-disclosure/

https://cve.mitre.org/cgi-bin/cvename.cgi?name=CVE-2017-5613


How to Install Softaculous

Softaculous is a tool or script that allows the automatic installation of open source, free, and commercial web applications within a few minutes such as WordPress, Joomla, etc. It has 1,115 PHP classes and 413 scripts. It allows users to easily and conveniently install any web application without having to upload, download or modify any files. It’s available for various web hosting platforms like cPanel, Plesk Panel, DirectAdmin, ISP System, Interworx, and H-Sphere.

If the installer is unable to download, connect, or verify the license, please make sure the following ip addresses are whitelisted in your firewall.

Installation process

Before installing Softaculous, you need to enable ionCube loaders in WHM, login as root, click Tweak Settings, then enable the ioncube checkbox. Then, login to the server as root via SSH and type the following commands:

Softaculous requires a monthly license to be able to install all of the scripts it has available. The free version is limited and only allows you to install a few scripts. You can get a license from Softaculous directly or any of their authorized distributors.


How to Find a Server’s Inode Usage

Before answering this question, let’s try and understand an inode. An inode (an index node) is used in Unix and Linux systems to index or reference a certain file. This file is a data structure that contains information about the files present in your hosting account or server. This data structure is added into the inode table. In inode, information like group and user ownerships along with access mode permissions like write, execute, and read as well as file types are stored.

Inode has two properties; attributes and disk block location. The following are the different attributes of Inode:

  • File type
  • File size
  • Group and ownership
  • File permission
  • Number of clicks
  • File deletion duration
  • File change, modification, and access change

The number of inodes corresponds with the number of folders and files in your account. For example, each webpage, cache file, email or image file is equivalent to one inode. Monitoring the inode is crucial for ensuring optimum performance of the server. You can view your account’s inode usage on the left side inside cPanel that says ‘File Usage’, or if you ssh into the server you can type: df -i

Activating this Feature

In cPanel, this feature is off by default, but you can enable it through the Tweak Settings link in WHM. In that page you can turn on the option ‘Display File Usage information in the cPanel statistics bar (inode count)’.

What if the Inode Usage has Exceeded?

The number of inodes is allocated to your account and if this usage is exceeded, you won’t be able to add any new files or emails.

Get a Detailed View of Inode Usage

If you’re interested in finding out a more comprehensive account of your inode usage and determine what is causing the maximum usage, SSH into your server and enter the following command:

SSH into your server and enter the following command

This will show you a complete usage of the inodes. If you want to view which folders/files are taking up the most inodes, use the following command:

find . -printf "%h\n" | cut -d/ -f-2 | sort | uniq -c | sort -rn

How to Block Countries in CSF Firewall

You may have a visited a website, only to find that it is not accessible from your geographical location. This is because your country’s IP address has been blocked in the firewall of the server the website is hosted on. This is actually a useful feature to prevent unauthorized users from gaining access to important information.

One such application is CSF or Config Server Firewall; it is a free firewall application created for Linux servers, VPS based on Linux, and various Linux distributions. CSF provides the following functions:

  • Filtering of incoming and outgoing packets
  • Flood, intrusion, and login detection
  • User interface integration for DirectAdmin, cPanel, and Webmin
  • Ability to deal with attacks like port scans, brute force attacks, and SYN floods

A frequently asked question by most Linux server users and administrators is whether it is possible to block specific countries in CSF. The answer is yes, and here’s how you can.

How to Do it?

CSF can be managed either through the control panel or through the command line. You can easily block unwanted countries from accessing your server. In order to do this, you have to open the configuration file of CSF by editing /etc/csf/csf.conf and then jump to the line that says
CC_DENY =

You can enter the 2 Letter Country Code for each country that you want to block, separate by commas.

For example, to block Thailand, Hong Kong, and Nigeria, the line should look like this:
CC_DENY = “TH, HK, NG”

Save the file and restart the firewall when you are done.

A list of countries and their 2 letter country code can be found at http://www.nationsonline.org/oneworld/country_code_list.htm

How to add SPF and DomainKey DKIM to all domains

There’s 3 ways to add an SPF record and DomainKey (DKIM) record

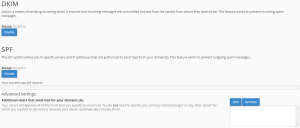
Method 1: Users can do it themselves inside cPanel. Login to cPanel, click the Email Authentication icon, and on this page you can click the Enable button below DKIM and below SPF. This will generate the DKIM key and also will add a generic SPF record.

dkimspf

You can also fill out the form below in the ‘Advanced Settings’ section if you would like to customize your SPF record. Be careful, if you do not know what you are doing, leave these alone. Wrong settings can cause your mail to get rejected.

Method 2: If you want to do this for your customers, it’s easier to do it in SSH at the command line. Simply type the following commands to automatically generate and install them.

/usr/local/cpanel/bin/dkim_keys_install username
/usr/local/cpanel/bin/spf_installer username

(Replace username with the actual account’s username)

Method 3: If you want to add an SPF and DKIM record for all existings domains on the server, simply copy and paste the following line and it will automatically add SPF records and DKIM records to all domains on the server

for username in `ls -A /var/cpanel/users` ; do /usr/local/cpanel/bin/dkim_keys_install $username && /usr/local/cpanel/bin/spf_installer $username ; done

cPanel vulnerabilities TSR-2016-0001

cPanel recently released a notice that all of the following versions of cPanel are vulnerable to a new issue found

11.54.0.4 & Greater
11.52.2.4 & Greater
11.50.4.3 & Greater
11.48.5.2 & Greater

You should update cPanel to the latest version to ensure you are protected from this. You can update cPanel via SSH or WHM.

How to redirect from main site to subfolder

If you are trying to redirect from www.yourdomain.com to www.yourdomain.com/subdirectory/ this requires a special .htaccess config to avoid creating a loop. You can use the following in the .htaccess of the main site. Replace yourdomain.com with your own website, and replace newfolder with the name of the folder you want to redirect to.

RewriteEngine on
RewriteCond %{HTTP_HOST} ^(www.)?yourdomain.com$
RewriteCond %{REQUEST_URI} !^/newfolder/
RewriteCond %{REQUEST_FILENAME} !-f
RewriteCond %{REQUEST_FILENAME} !-d
RewriteRule ^(.*)$ /newfolder/$1
RewriteCond %{HTTP_HOST} ^(www.)?yourdomain.com$
RewriteRule ^(/)?$ newfolder/index.php [L]

Courier mail software deprecated, Dovecot mail now required

cPanel has offered 2 options for pop/imap mail software for several years. But now Courier is being deprecated and cPanel is now requiring all servers to be upgraded to Dovecot.

You may have received the following notice:

The cPanel & WHM update cannot proceed because the following service has been deprecated: Courier 

 You have 27 day(s) and 23 hour(s) until we remove Courier and replace it with Dovecot. 

 To continue using Courier, you must change your Update Preferences in WHM to Long Term Support (LTS). By switching to LTS, you will not receive new features and eventually will stop receiving security updates. 

 cPanel & WHM version 11.52 will be the last LTS version to support Courier. 

 For more information about Long Term Support: https://go.cpanel.net/longtermsupport


To be able to continue receiving updates and stay current with the latest features of cPanel, it’s best to switch now to Dovecot.

This can easily be done in WHM, go to the link ‘Mailserver Selection’, then on that page click the button next to Dovecot, and click Save at the bottom.

It will automatically switch and convert the entire server. There should be no downtime and no lost mail. Users should not notice any difference and should be completely seamless.


another glibc vulnerability CVE-2015-7547

Yet another glibc vulnerability has been detected on Feb 17, 2016 which effects:

Red Hat Enterprise Linux 6 & 7
CentOS 6 & 7
CloudLinux 6 & 7
(It also effects non-cpanel operating systems Debian Squeeze, Wheezy, Jessie, Ubuntu 12.04 & 14.04)

To patch your server, type:

yum clean all
yum -y update glibc


For more technical information on this vulnerability, please see:
http://www.kb.cert.org/vuls/id/457759
https://googleonlinesecurity.blogspot.be/2016/02/cve-2015-7547-glibc-getaddrinfo-stack.html
https://access.redhat.com/errata/RHSA-2016:0176

[check_cpanel_rpms] There are altered RPMs on ….

After the recent cPanel updates you probably received a notice like this

[check_cpanel_rpms] There are altered RPMs on ….

The system detected problems with the following cPanel-provided files
that the RPM controls:

RPM Status Additional Information
cpanel-cgiemail-1.6-5.cp1136 Missing
cpanel-wwwcount-2.5-5.cp1136 Missing
…..

If you did not make these changes intentionally, execute the following
command as the root user to correct them:

/usr/local/cpanel/scripts/check_cpanel_rpms –fix
This notice is the result of a request from rpmcheck.

This notice was generated ….

Altered RPMs Check notifications are currently configured to have
an importance of High. You can change the importance or disable
this type of notification in WHMs Contact Manager at:
https:// …. :2087/scripts2/editcontact?event=Check::CpanelRPMs

This notice is most likely harmless, it is just letting you know that the update/check process encountered something that was unexpected. Just look at  the RPM’s listed to see what it found. If it is something that you intentionally removed or disabled, you can disregard this notice. Otherwise, you can run the following command to repair the errors found:

/usr/local/cpanel/scripts/check_cpanel_rpms –fix


How to migrate email from an old non-cPanel server to a new cPanel server

When migrating from one cPanel server to another cPanel server it’s easy and automatic, but if you need to migrate your email from an old host without cPanel it’s not automatic, but there’s still an easy way to do it with this tutorial.

First, download and install Thunderbird on your computer if you do not already have it. Thunderbird is a common popular desktop email program.

Second, you will have to add 2 email accounts in Thunderbird, the old email account and the new email account. When adding the old email account, set the mail server to the old server’s ip address, and in the Description field type something to indicate it is the old account. Similarly, when adding the new email account, set the mail server to the new server’s ip address. I recommend using the IMAP protocol for both the old and new account.

Lastly, now with both accounts loaded into Thunderbird, click on the old account from the left panel, and on the right side where all the emails are listed, just drag & drop the emails into the new account’s folder on the left panel.

There’s no limit to how many you can move at once, but from my own experience in doing this, you should only move small amounts of emails at a time.

How to migrate some sites or an entire server without downtime

cPanel makes it very easy to migrate between servers. If done properly, most likely there won’t be any downtime.

In this tutorial, we’ll break it down into 3 parts

A) Preparing the new server

  1. Setup the hostname. You can either use the same hostname as the old server or choose a new hostname
  2. Setup the nameservers. To make the transition seamless, it’s best to use the same nameservers as the old server.
  3. Install the same software, versions, modules, etc., that you have on the old server. Most importantly, the mysql & php version and modules should be the same as the old server.

B) Migrating the accounts

  1. Using the Transfer Tool link in WHM on the new server, enter the old server’s ip, ssh port, root password, then click Fetch Account List.
  2. On the next page, it will show all of the accounts. You can select all of the accounts you want to transfer. All of the options can be left as the defaults. Then click Copy

C) Once the transfer is complete

  1. Verify all of the accounts by checking the contents via FTP and testing them at the temporary url (http://SERVERIP/~username/). Please note that some sites will not display properly at the temporary url and will only work once the domain resolves to the new server.
  2. If everything is working properly on the new server, you can change the nameserver’s ip addresses at the domain registrar. For example, if all domains are using ns1.yourdomain.com and ns2.yourdomain.com, then change the ip addresses they point at to the new server’s ip addresses.
  3. Within about 24 hours all of the domains should be resolving to the new server. Over the next few days, test the sites again to make sure everything is working.

Since propagation & caching can take up to several days around the world for various reasons, keep testing the sites for a few more days. If no problems are detected, then you can temporarily power down the old server.

Continue to keep checking the sites over the next few more days. If you do not see any problems, then you can cancel the old server. Please remember that once the old server is cancelled, it is gone forever. So it’s important that you thoroughly check everything before cancelling the old server.


Easiest way to reset your wordpress admin password

Did you forget your wordpress admin password? Don’t panic! Here’s the easiest way to reset your password.

We realize that there’s plenty of tutorials online to reset your admin password but they are all complicated and require a lot of command line ssh experience. In just a few steps you can reset your admin password right through cPanel in less than 2 minutes.

  1. Go into PhpMyAdmin (either through WHM or cPanel)
  2. Select the database of your WordPress (if you are unsure which database to select please read the bottom of the post)
  3. Select the ‘wp_users’ table
  4. Click Edit (pencil icon) next to the line that says ‘admin’
  5. On the line that says ‘user_pass’ change the dropdown to MD5 and in the text field right next to it enter your new password
  6. Click Go at the bottom to save it and you’re done!

Now try to login to your WordPress with the new password.

If you are unsure which database to select or have multiple WordPress installations, you can open the wp-config.php file in the File Manager and look at the line that says DB_NAME and it will show you the database to use.

Important security update for cPanel TSR-2016-0001

cPanel announced the following security notice which applies to almost all versions.

Last week, on Jan 18, 2016 cPanel released TSR-2016-0001 with important security updates for cPanel & WHM. Our records indicate the
following cPanel & WHM installations need updated:

0.0.0.0

We urge you to update to the latest build as soon as possible. The following cPanel & WHM versions address all known vulnerabilities:

11.54.0.4 & Greater
11.52.2.4 & Greater
11.50.4.3 & Greater
11.48.5.2 & Greater


To patch this, simply update cPanel via WHM or SSH.
In WHM, you can click the “Upgrade to Latest Version” link.
In SSH, you can type:
/scripts/upcp –force


How to install Linux Malware Detect LMD maldet

Installing LMD is very easy and can be done in just a few steps

wget http://www.rfxn.com/downloads/maldetect-current.tar.gz
tar -xvf maldetect-current.tar.gz
cd maldet*
./install.sh

That downloads the file, extracts it, goes into the folder it created, and installs it, and that’s all!

You can use it the way it is right out of the box, but if you want to configure the email notification option, quarantine option, etc., this can be done by editing the maldet config file at /usr/local/maldetect/conf.maldet

The options are pretty self explanatory and the conf file is well documented with comments above each option.

The quarantine option should only be used if you are sure you want to automatically quarantine files it detects. This can be dangerous as sometimes that are false positives that can be detected and it can wind up quarantining an important file which results in breaking a site.

Now on to using Maldet, first update it before running any scans by typing:

maldet -d && maldet -u

Then you can either scan an individual account or the entire server. To scan an individual account you can type:

maldet -a /home/user

To scan the entire server you can type:

maldet -b –scan-all /home?/?/public_?

To see all reports available you can type:

maldet –report list

Then to show the details of a specific report type:

maldet –report THE_SCAN_ID

By default, the quarantine option is disabled, unless you enabled it in the conf file. If you want to quarantine the files found in a report, you can type:

maldet -q THE_SCAN_ID


/var space full

In the old days when hard drives were smaller, the /var partition was usually set to about 10gig. That was fine a long time ago, but now as space requirements/consumption increases, small /var partitions are starting to fill up much faster

For future reference if you get a new server, the /var partition should be at least 50gig or should be on the / partition with sufficient space.

In the meantime, here’s a few ways to clean up /var

  1. Clear old logs from /var/log/
    There’s usually several log rotations kept here. You can safely remove the old rotated backups here.
  2. Empty the mail queue
    This can be done from WHM in the Mail Queue Manager or in ssh by emptying /var/spool/exim/ folders
  3. The cpanel bandwidth folder can grow pretty large
    If you are not concerned with bandwidth tracking, you can clear out /var/cpanel/bandwidth/
  4. Other non-vital areas that often consume a lot of space that can be removed are the eximstats db, logwatch cache folder, etc.

Since the /var partition holds a lot of logs, databases, mail queue, etc., it is completely normal to fill up over time. Depending on how many sites you have and how much activity you have, you may have to clean it up every few weeks. The average usage on a /var partition that is 10gig is about 50% used.

If the /var usage is still too high, you can type
du -sh /var/*
to find out which folder is using the most and dig deeper into the folders.

As a last resort if /var is still too full, MySQL can safely be moved to another partition but this should only be done if you are fully experienced with ssh.

Standby, we will cover cleaning up other partitions and moving MySQL is an upcoming post 🙂

The last attempt to update cPanel & WHM was blocked

If you are seeing this error it can mean one of many possible reasons, most likely it is nothing to worry about

First, login to WHM and click ‘Details’ next to “The last attempt to update cPanel & WHM was blocked”. A small popup window will explain what the issue is.

Here’s one of the possible reasons:

“Please correct these issues and rerun updates.
info: Upgrade to the next LTS is blocked until Monday Jun 22, 2015 in order to distribute upgrades over a five day period. If you wish to upgrade now, you can do so now with the force option.”

When cPanel releases major updates, it spreads out the distribution over a period of time to avoid everyone from updating at the same time which would result in overloading their servers. So don’t worry, just wait until the date shown for it to automatically complete the update. If for any reason you want to upgrade right now, you can simply login to ssh and type the following to force it to update now:

/scripts/upcp –force


cPanel fatal: Cannot upgrade due to insufficient disk space.


If you are getting any of the following errors that cpanel won’t update because /usr is full or does not have enough space

—–
The last attempt to update cPanel & WHM was blocked.
Please correct these issues and rerun updates.
fatal: Cannot upgrade due to insufficient disk space. Detected ?GB. You will need at least 3GB to install/update to a new version of cpanel.
—–

cPanel & WHM cannot update due to insufficient disk space in the staging
directory, “/usr/local/cpanel”. The system requires 3 GB to update; this
directory only has ? GB available.
—-
W NOTE: A system upgrade was not possible due to the following blockers:
W [FATAL] – Cannot upgrade due to insufficient disk space. Detected ?G. You will need at least ?G to install a new
version of cPanel
—-

Here’s a few fixes you can try:

Fix #1: Clear up unnecessary logs in

/usr/local/cpanel/logs/
/usr/local/apache/logs/
/usr/local/apache/domlogs/

Fix #2: Remove unnecessary old or duplicate folders such as
/usr/local/apache.*
/usr/local/maldet.*

Fix #3: CAUTION: This should only be done as an absolute last resort. This fix is dangerous and if done incorrectly can break your server. You should only do this if you are an experienced system admin. If not, ask someone experienced to do this for you. This method is not recommended by cpanel. This is just a workaround to resolving this where there are no other options rather than reloading your entire server

1) Stop crond, exim, cpanel, apache, mysql, leechprotect
2) Verify none are running by typing: lsof | grep /usr/local/cpanel
3) Make an empty folder at: /home/usr/local
4) Move /usr/local/cpanel to /home/usr/local/cpanel
5) Make an empty folder at: /usr/local/cpanel
6) Set the permissions: chmod 711 /usr/local/cpanel
7) Add the following line to the /etc/fstab file (save a copy of the file first before editing it):
/home/usr/local/cpanel /usr/local/cpanel none rw,bind 0 0
8) Mount the folder: mount /usr/local/cpanel
9) Now restart all of the services that were stopped
10) Update cpanel: /scripts/upcp –force

GLibc GHOST Vulnerability CVE-2015-0235

On 27 January 2015, a vulnerability in all versions of the GNU C library (glibc) was announced by Qualys. The issue was a buffer overflow during DNS hostname resolution. Disclosure of this issue was coordinated with the various operating system vendors and patches were made available by RedHat soon after the initial announcement went out.

According to Qualys, this vulnerability allows unauthenticated remote code execution in any daemons or services that perform hostname lookups using the vulnerable functions in the GNU C library. This library is at the core of most services and software that runs on Linux systems.

Qualys developed working attacks for the EXIM mail transport agent that all cPanel & WHM systems use. Qualys also created a Metasploit module to make testing or exploitation of the vulnerability straightforward for an attacker. At present, Qualys has not released any attack code, only detailed analysis of the flaw and its impact.

To patch this, you can type:
yum clean all
yum update glibc

To verify that it has been patched, you can type the following to check for the changelog entry:
rpm -q –changelog glibc | grep CVE-2015-0235

bash Vulnerability bug ShellShock CVE-2014-6271

Related CVE-2014-6271, CVE-2014-6277, CVE-2014-6278, CVE-2014-7169, CVE-2014-7186, CVE-2014-7187

On Sep 24, 2014 an advisory for a vulnerability with bash has been issued and can be seen at http://web.nvd.nist.gov/view/vuln/detail?vulnId=CVE-2014-6271

To test if your server is vulnerable or not, you can type the following in ssh:

env x='() { :;}; echo vulnerable’ bash -c “echo testing”

If the output says “vulnerable” then it is vulnerable to this exploit.

To patch this vulnerability, in ssh type the following:

  1. yum clean all
  1. yum update


How to Create a RAM Disk

In some cases, setting up a memory-based file system may be preferable, as it allows memory on a server to be used like a disk partition. This is an excellent option for caching files and other temporary data, since RAM is faster than using physical disk space. There are two types of RAM disks that can be used:

  • ramfs
  • tmpfs

Ramfs creates uses the same method of storing files as the Linux file system cache, with the downfall that it will continue using memory storage until the system runs out of RAM, which can cause the system to crash or become unresponsive. Tmpfs, however, behaves like a physical partition on the disk and is capable of running out of space. With that said, it’s also possible for it to occupy swap space if the server runs out of RAM, possibly defeating the purpose of using a ramdisk altogether.

Before creating a RAM disk, check how much RAM you generally have available on your machine. You can use ‘free’ to see the current usage, or ‘sar -r’ to see historical usage. You’ll want to make sure you have enough free RAM on your system to accommodate a RAM disk.

Check the amount of free RAM you have left on your machine before creating a RAM disk. Use the Linux command free to see the unused RAM. The below is an example of a 31GB of ram in a production server.

Next, create a folder to use a a mount point, for example:

mkdir /mnt/ramdisk

Then mount it:

mount -t [tmpfs|ramfs] -o size=1024m [tmpfs|ramfs] /mnt/ramdisk

Using ‘ramfs’ as a type will denote ‘size’ as a starting size only, since it does not have a physical limit. The above example creates a 1GB ramdisk.
To retain the mountpoint over reboots, you should add this to /etc/fstab as well. Keep in mind that since this is data stored in RAM though, anything stored here will be erased every time the server is rebooted.

tmpfs /mnt/ramdisk tmpfs nodev,nosuid,noexec,nodiratime,size=1024M 0 0

How to Correct Email SSL Hostname in cPanel Interface

Users in cPanel have the convenient option of automatically setting up their mail clients using a downloaded setup file, or the printed list of configurable values that displays in the cPanel interface under Mail -> Email Accounts -> Configure Email Client.  If you’re offering secure email services under a specific SSL hostname for the user to connect to, there are times where the Configure Email Client hostname may be incorrect.  This is especially true if you are using a wildcard SSL certificate for service SSL access, which will cause this feature to default to the server’s hostname.

To correct this, all you need to do is edit the following files in /var/cpanel/ssl:

  • courier-imapd-DOMAINS
  • courier-pop3d-DOMAINS
  • exim-DOMAINS
  • dovecot-DOMAINS


The files should contain the secure hostname that you want your customers to use when accessing email over SSL.  To make this simpler, you can use the following script:


SSL_HOST=secure.hostname # Replace this with the desired hostname
SERVICES=(courier-imapd courier-pop3d exim dovecot)
for file in ${SERVICES[@]}
do
echo $SSL_HOST >  /var/cpanel/ssl/$file-DOMAINS
done

Save the above script into a file, set the permissions to 755, and run it normally.

How to Change the Apache Default Document Root on a cPanel Server

By default, cPanel configures Apache to load its default website from /usr/local/apache/htdocs.  This page will redirect to the template of the default page that is set up by cPanel, which is configurable via WHM -> Web Template Editor.

If you want to change the location of the default site altogether, you’re going to need to modify one of the EasyApache templates.   This particular modification is easy to do:

cd /var/cpanel/templates/apache2/

cp main.default main.local


The main.default is used to build the structure of the entire httpd.conf, which in turn also pulls in other templates from various locations.  When you copy this to main.local, you’re telling EasyApache to use the .local file instead.  If the main.local already exists, you can probably just edit the existing version.

In this file, you’re looking for a defined VirtualHost entry that starts with this:


<VirtualHost [% vh %]>
ServerName [% servername %]
DocumentRoot [% serverroot %]/htdocs


You’ll want to change the DocumentRoot setting to the location of the files you want to serve.  You may also need to set SuPHP_UserGroup to the user/group of the cPanel account that owns the files.  Here’s a DocumentRoot example:


DocumentRoot /home/user/public_html/


Once you’ve changed this, run the following to apply your settings:

/scripts/rebuildhttpdconf

service httpd reload


Perfect Forward Secrecy with Apache 2.2 on a cPanel Server

Perfect Forward Secrecy (PFS) is a security measure that helps to ensure that a session key cannot be compromised if one of the long-term keys in its set is compromised at a later date.  With PFS, if a single key is compromised, only data protected by that key has the potential to be compromised as well.  This is a feature specific to SSL connections that is now a somewhat standard requirement for passing PCI scans.

Apache 2.4 has this ability built-in, but Apache 2.2 supports the PFS-required ciphers as of 2.2.26.  To enable this, you’ll need to make a few adjustments to the main Apache template.  First, you need to change the SSLCipherSuite value. You can adjust this in WHM -> Apache Configuration -> Global Configuration, in the SSL Cipher Suite box.  Change this value to:

SSLCipherSuite EECDH+AES:EDH+AES:-SHA1:EECDH+RC4:EDH+RC4:RC4-SHA:EECDH+AES256:EDH+AES256:AES256-SHA:!aNULL:!eNULL:!EXP:!LOW:!MD5

Then save the file.  You can also adjust this in /var/cpanel/conf/apache/local.

From here, you will need to add an additional setting to tell Apache to honor the cipher order you just defined.  To do this:

cp /var/cpanel/templates/apache2/main.default /var/cpanel/templates/apache2/main.local

If main.local already exists, just use the existing file.

look for “SSLCipherSuite” in the template, it will look something like this:

[% IF main.sslciphersuite.item.sslciphersuite.length %]SSLCipherSuite [% main.sslciphersuite.item.sslciphersuite %][% END %]

Above this, add the following line:

SSLHonorCipherOrder on

Save the file, then apply the settings:

/scripts/rebuildhttpdconf

service httpd restart


To confirm PFS is working, you can run an SSL test here:

https://www.ssllabs.com/ssltest/

How to Limit the Number of Kernels Installed

Many Linux distributions do not clean up old kernels when new ones are installed.  This can become problematic in situations where /boot is on its own partition with a limited amount of space.  While you can easily clean up the boot partition of old kernels, this is a task that you may prefer to automate, especially if you’re dealing with multiple servers.

First, install the yum-utils package, if it isn’t already there:

yum install yum-utils

Once this is installed, you can run the following command to remove old kernels:

package-cleanup --oldkernels --count=3

The count parameter defines how many kernels you want to keep.  So in the above example, the last three kernels will be retained.  You do not have to run this command every time you update the kernel version though, because there’s a parameter you can add to /etc/yum.conf to do this automatically:


installonly_limit=3

How to Change a Parked Domain to an Addon Domain

Cpanel supports both parked domains and addon domains, with the ability to easily remove a domain as one and re-add as the other.  However, you may find this problematic if you have set up email addresses, filters, or mailing lists under a parked domain and want to make it into an addon domain.

While performing this action is not directly supported by cPanel at this time, there is a way to do this if you have root access to your server.

1) Create a subdomain

cPanel maps addon domains to subdomains of the main domain on the account.  So go into cPanel and create a subdomain for the parked domain.  For example, if your parked domain is mydomain.com, create:

mydomain.maindomain.com


2) Edit main userdata file

Go into /var/cpanel/userdata/$user/ and open up the main file in an editor.  You should see something like this:

addon_domains: {}

If you have existing addon domains, you’ll see them listed and can just add your domain to the list.  Otherwise, alter the entry to look like this:

addon_domains:
  mydomain.com: mydomain.mymaindomain.com

The “mydomain.mymaindomain.com” is the subdomain you created in step 1.

Remove the domain from the parked_domains section of this file, then save and close.


3) Edit the Virtualhost

In the same folder, open the config file for your main domain and remove the parked domain from the serveralias: line – including the www for the parked domain.

Open the file for the subdomain you created in step one, and add the parked domain to the serveralias: directive.

Make sure the mydomain.mymaindomain.com part is the same as the subdomain you created in step 1.


4)  Update cPanel config

Run the following commands:

/scripts/updateuserdomains

/scripts/rebuildhttpdconf

service httpd restart


If you go into cPanel now, the domain will be listed and treated as an addon domain, and you and upload the website’s files to the location you specified when you created its subdomain.

How to Block an Entire .TLD with Exim

cPanel comes stock with a number of ACLs and tuneables to help reduce the amount of unwanted email into your server.  At present, there are not a lot of controls on the Exim side that allow for blocking specific email addresses or servers.  While you can easily use the integrated SpamAssassin controls on a per-cPanel account basis,  it’s generally less resource-intensive to handle these blocks at SMTP time.

cPanel’s implementation of Exim is set to automatically load filters from an include directory.  This directory is located here:

/usr/local/cpanel/etc/exim/sysfilter/options/

Any files you drop in here will be included into the Exim filter.  First, create a file in this folder.  You can name it anything you want, but we’ll call ours inbound_tld_block:

vim /usr/local/cpanel/etc/exim/sysfilter/options/inbound_tld_block

In this file, add the following filter, replacing .tld with the actual TLD you want to block:
if first_delivery
and ("$h_to:, $h_cc:" contains ".tld")
or ("$h_from:" contains ".tld")
then
seen finish
endif

Now go into WHM -> Exim Configuration Manager -> Basic Editor -> Filters, and you should see the new filter listed:

** Custom Filter: inbound_tld_block

If it’s not already enabled, enable it here and then save.

To disable the filter, you can set it to “Off” in the same location in WHM and hit Save again.

#exim, #spam

cPHulkd vs. LFD/BFD: A Comprehensive Comparison

With brute-force attacks being an ongoing headache for system administrators, it’s no wonder that firewalls engineered to deter these attacks are becoming more commonly used.  On the top of the list, as far as cPanel servers are concerned, are LFD, CFD, and cPHulk.  This article will touch on what each of these solutions is intended to do, how they work, and how you can determine which one is best for you.

What’s a Brute Force Attack?

First things first – if you’re going to use a firewall to stop a brute-force attack, it would be helpful to know what this attack actually is.  When someone is brute-forcing your server, they are basically taking a list of usernames or passwords – whether the list is pre-compiled or generated on the fly – and trying those credentials against something on your server, typically in an automated fashion.  The goal of the attacker is to eventually find a combination of login credentials that grants access.

Obviously, your first defense against this sort of attack is having a decently strong password, and changing it regularly.  This, however, isn’t a complete solution, as most of us are dealing with one or both of the following scenarios:

  • A number of end users that don’t quite understand the concepts of secure password selection, storage, and rotation (i.e., the user that has habitually used “p@ssw0rd” for everything since 1999)
  • The brute-force attack becomes resource-expensive for your server, resulting in resource exhaustion and service outages

In response to this problem, LFD, BFD, and cpHulk tend to be the main solutions considered for mitigation.  So let’s look at these more in depth.

cPHulkd

CpHulk is a native cPanel application-level firewall that essentially rejects any login attempt from an IP address that has previously failed proper authentication after a certain number of tries within a certain period of time.  When an IP reaches this threshold, it is added to the cPhulk blacklist (which is essentially a table in a MySQL database), and ties into the Linux PAM system to dynamically block that IP from authenticating any further.

Now, there are some advantages to this.  For one, it’s easy to set up and manage.  All you have to do is go into WHM -> cPHulk Brute Force Detection, and turn it on.  All of your management is done from this location, and if you manage to get yourself blocked, you can easily SSH into your server, jump into the database, and clear the block.  You can also whitelist yourself so you don’t manage to get blocked.

With that in mind, being able to SSH into a server that you are essentially supposed to be blocked from is, in all actuality, a problem!  With cPHulk, being an application-level firewall, it does not actually block any IP from accessing your server.  The IP can still connect to any service that responds publicly and continue to try to brute-force it.  Though cPHulk will simply deny the login, the fact of the matter is, the IP is still opening a connection to your server and attempting to create a session.  This, on a large scale, can become an unnecessary waste of resources, especially on very busy servers.

LFD & BFD

LFD (Login Failure Daemon) is an extension of the popular ConfigServer Firewall (CSF), which BFD (Brute-Force Detection) is an extension of Advanced Policy Firewall (APF), another very popular choice for Linux servers.  Both of these are based off of the natively-provided iptables module, which is basically the main component of most Linux firewalls.  While the method in which they run varies slightly, both LFD and BFD are similar in nature – they scan through log files for failed logins that exceed a set threshold, then block the IP address from the server either temporarily or permanently, depending settings you choose.

The advantage to this is the fact that when an IP is added with a DROP rule via iptables, the IP cannot connect to the server until the rule is removed.  Since no connection can be established, no further login attempts from that IP can be made.   This is the preferred behavior of most system administrators.

As a possible disadvantage, if you manage to block yourself, you could be in trouble since you’d essentially have no way of accessing your server (from that IP of course) until the block clears.  That is, if it clears.  There does exist the possibility of whitelisting your own IP or using the WHM autofixer if you happen to lock yourself out (but again, you may even be unable to access WHM).  In that effect, the installation and configuration of both LFD and BFD is slightly more complex than that of cPHuld, in that you’d typically be doing it via CLI.  CSF, once installed, does have a WHM interface to provide for easier configuration, though some familiarity with Linux firewalls may be needed to understand some of the more complex settings.  CSF also tends to be a little too feature-rich for its own benefit, often making the configuration more frustrating for users that are less-experienced.

Conclusion

While all three of these solutions can be effective at mitigating brute-force attacks against your applications, large-scale attacks involving hundreds of different IP addresses may be too intense for any of these to handle.  This is something to keep in mind when choosing your solution.  cPHulk is good for very small-scale attacks, while BFD and LFD are effective at handling larger ones.  Attacks exceeding the capabilities of either may require more sophisticated measures, such as a network-level firewall or IDS. The ease of configuration (and making sure you’re setting things up properly) is also a factor to consider.  Either way, some protection is better than none.

#cphulk, #security

How to Disable a Domain From Sending Email

You can easily disable inbound email for a single domain simply by switching off the MX records and/or removing the domain from /etc/localdomains.  However, disabling a domain from sending email off of your server is slightly more complicated.  Even if you manage to disable the domain of an account from sending out, you still have to deal with the fact that the cPanel user itself can send email.  This user has the address of user@serverhostname, and is the default sender for scripts that utilize sendmail.  In other words, any PHP or Perl script that sends email off of your server without using proper SMTP authentication will send mail as the cPanel user.

Disable Email from Specific Domains

First, create a file called /etc/blockedsenderdomains, and add the list of domains to block email from to this file, one line at a time.
Then go into WHM > Exim Configuration Manager > Advanced Editor, and add the following to “Section: CONFIG” part:

domainlist blocked_domains = lsearch;/etc/blockedsenderdomains

In the ROUTERSTART section, add:

reject_domains:
 driver = redirect
 domains = +blocked_domains
 allow_fail
 data = :fail: Connection rejected: SPAM source $domain is manually blacklisted.

Then save the file.

New cPanel Installer Requirements

As of this writing, the newest version of the cPanel installer poses some additional requirements for new installations:

  • cPanel must be installed on target version 11.40
  • For any Redhat-based OS (RHEL, CentOS, CloudLinux), you must be on version 6

If your server does not meet these requirements, you have two options:

A.  Install version 11.38 as a target version

To do this, you’ll need to create a file called /etc/cpupdate.conf before cPanel is installed on your server.  In this file, add:

CPANEL=11.38

Then run the installer normally:

wget http://layer2.cpanel.net/latest
sh latest

From here, you can upgrade to the latest version by replacing “CPANEL=11.38” with:

CPANEL=stable

or the version you want to upgrade to, ie:

CPANEL=11.42

Then run /scripts/upcp to update.

B. Force the installation

Download the installer and run with the –force flag:

sh latest --force

Note that these instructions will become invalid once cPanel 11.38 becomes EOL.  The restrictions are intended to encourage system administrators to run the latest software.

How to Clean up the /boot Partition

As updates run on your server over time, you’re likely going to accumulate a number of different kernel versions.  When upgrading within the same OS version, old kernels don’t typically get cleaned up automatically.  This is to enable you to “roll back” to an older kernel if you experience problems with a newer one.

A common consequence of this is the /boot partition filling up with old kernel images.  You can safely uninstall any kernel version that you are not currently running.  To get your current running kernel, use uname:

uname -r

This will output something like:

2.6.32-431.3.1.el6.x86_64

Now find a list of all installed kernels:

rpm -qa |grep kernel

You can remove the kernel and kernel-devel packages for any kernel that you are not currently running.  In this example, you’ll not want to remove kernel-2.6.32-431.3.1.el6.x86_64.  You will usually not find more than one instance of kernel-headers or kernel-firmware, but if you do, you can remove the unused version of those too.

Note: If you’re running Ksplice for kernel updates, there are actually two kernels you should not remove: that’s the one listed above, as well as the one shown in the output of “uptrack-uname -r”.  While Ksplice patches the kernel in memory, removing an existing RPM for the acting kernel can cause unpredictable behavior.

Remove the old kernels as so:

rpm -e kernel-2.6.32-358.0.1.el6.x86_64

rpm -e kernel-devel-2.6.32-358.18.1.el6.x86_64

And so on.  Doing this will free up the unneeded files from /boot.


How to Upgrade to MySQL 5.6 on cPanel

cPanel 11.42 and higher supports MySQL 5.6.  Upgrading is simple, and if you’re coming from MySQL 5.5 you will not need to recompile PHP after the upgrade.

If you’re coming from a version prior to 5.5, it’s recommended that you upgrade to 5.5 first, then to 5.6.  The following upgrade process can be used for essentially any supported MySQL upgrade in cPanel versions 11.36 and higher.

First, set the cpanel.config file to the intended version:

/var/cpanel/cpanel.config

Look for mysql-version=, and set this to 5.6.

Then run the following script:

/usr/local/cpanel/scripts/check_cpanel_rpms –fix

This will remove the old MySQL version, install the new one, and update all tables.

If you are coming from a version earlier than 5.5, you will likely need to reinstall PHP by running EasyApache.  This is due to the fact that PHP is compiled against the MySQL client libraries, which will be different after the MySQL is upgraded.

#cpanel, #mysql-version, #php

cPanel Server Management blog has been born!

I’d like to thank everyone for visiting and looking forward to a great blog that people can rely on for helpful tools and techniques related to managing a cPanel server!